.png)
.png)
Getting your fence to stand straight, stay sturdy, and last for years starts at the very bottom. Fence posts in concrete are the gold standard for residential fencing across the Pacific Northwest, and for good reason: when the foundation is solid, everything built above it performs the way it should.
At Optima Fence and Deck, we've installed hundreds of fences across Bellevue and the surrounding communities. The number-one source of fence failures we see isn't the wood, the panels, or the hardware. It's the posts. A post set too shallow, out of plumb, or without adequate drainage will undermine the entire fence structure over time.
This guide gives you the full process, from marking your fence line to curing the concrete, so your posts hold firm for 15 to 20 years or more.
Why Concrete Is the Best Anchor for Fence Posts
Some homeowners backfill post holes with the dirt they removed, or pack in gravel alone. That approach might feel solid on day one, but it tends to shift, settle, and lean as seasons change and soil moves.
Concrete fence posts (meaning posts anchored with a concrete surround) resist movement in a way no other backfill method reliably matches. Concrete distributes wind load and fence weight into the surrounding soil, locks the post through freeze-thaw cycles, and provides a consistent foundation regardless of soil type.
For gate posts in particular, concrete is essential. The swinging weight of a gate creates continuous lateral stress on the post. Without concrete, that post will lean within a season or two, and your gate will stop latching before long.
What You Need Before You Start
Before you dig the first post hole, gather your materials and take care of two important pre-project steps.
Tools and materials:
- Post hole digger or power auger
- Spirit level
- String line and stakes
- 2x4 scrap wood and stakes for bracing
- Fast setting concrete (multiple 50 lb or 80 lb bags)
- Gravel or crushed stone
- Water
- Measuring tape and marking paint
Call 811 before you dig. This is required by law in Washington State. The 811 service marks underground utility lines within a day or two, at no cost to you. Hitting a buried line is dangerous and expensive.
Check local laws. Bellevue and King County have fence height limits and property setback requirements. Before you finalize your fence line, confirm the rules with your local building department, especially if you're building near a property boundary.
Step-by-Step: Setting Fence Posts in Concrete
Here's the full process we recommend for **setting fence posts in concrete** from the first string stake to the final cure. Follow these steps in order for the best result.
Step 1: Mark Your Fence Line
Stretch a string line between corner stakes to mark the exact path of your fence. This gives you a consistent reference for keeping all posts aligned as you work down the line.
Start with your corner posts and gate posts, then place your line posts between them at consistent spacing, typically 6 or 8 feet apart depending on your fence panels. Getting the layout right before you dig saves a lot of adjustment later.
Step 2: Dig the Post Holes to the Right Depth and Width
The standard rule: dig each hole to a depth of 1/3 the total post height. A fence with 6 feet of post above ground needs at least a 3-foot hole below grade. The hole should also be at least 3 times wider than the post itself, which gives the concrete enough volume to anchor firmly.
In areas prone to frost heave, including parts of Bellevue that see hard winters, you need to dig below the local frost line. Check with the city or King County for the minimum required depth in your specific area.
Step 3: Add a Gravel Base for Drainage
Before placing any post, pour 4 to 6 inches of gravel into the bottom of the hole. This gravel base creates a drainage layer that prevents water from pooling at the bottom of the post, which is exactly where rot begins.
Proper drainage is one of the most overlooked steps in the entire process. In clay-heavy or low-lying areas where soil holds water after rain, skipping this step significantly shortens the life of your posts. Even in well-draining soil, gravel at the base is a best practice for protecting posts long-term.
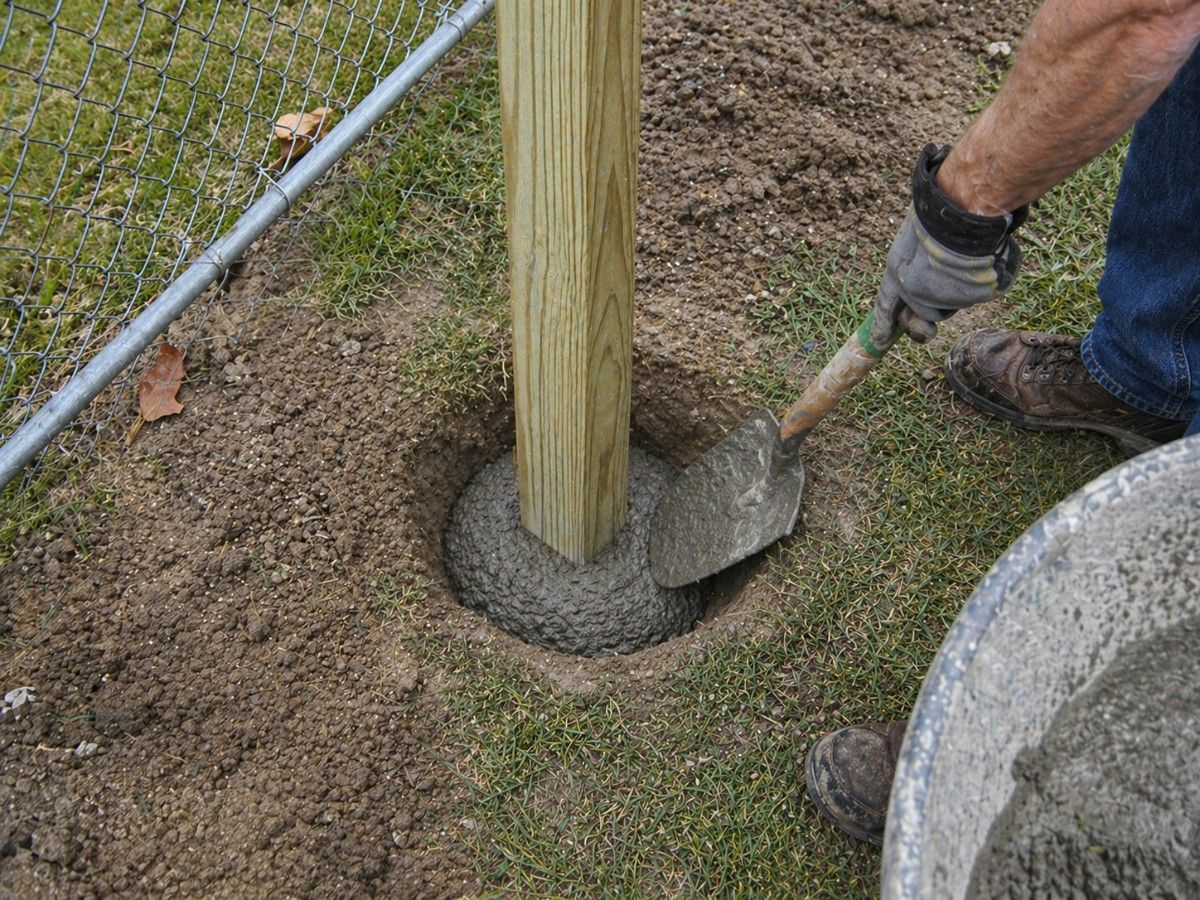
Step 4: Place the Post and Check Plumb
Place the post in the center of the hole, resting it on the gravel base. Use a spirit level to confirm the post stands perfectly vertical, checking on two adjacent sides of the post. Checking only one face gives you a false reading and can leave the post slightly off-plumb in a direction you didn't catch.
Once plumb, brace the post using 2x4 scrap wood and stakes driven into the ground on two sides. Check plumb again after bracing and make any fine adjustments before you pour. Posts have a way of shifting slightly when you let go, so a second check takes only a moment and saves a lot of frustration.
Step 5: Pour the Concrete Mix
Installing fence posts in concrete with a fast-setting dry mix is the most practical method for most residential projects. Pour the dry concrete mix directly into the hole around the post without pre-mixing it in a wheelbarrow first.
Fill the hole with dry mix to within a few inches of the surface. Avoid pre-mixing wet concrete in a separate container unless you have a specific reason for it, such as working in very dry soil conditions where the dry-pour method may not activate fully. For most Bellevue fence projects, dry-pour fast-setting concrete is the right call.
Plan on about two 80 lb bags of concrete mix per standard line post. For gate posts that carry heavier load, use three bags to ensure maximum stability.
Step 6: Add Water and Let It Cure
Slowly add water according to the product instructions, typically about 1 gallon per 50 lb bag. The water activates the concrete from within, and most fast-setting products firm up within 20 to 40 minutes of add water contact.
Resist the urge to add too much water. Over-saturating the mix weakens the final result and can cause cracking as it dries. Add water gradually, let it absorb fully, then check before adding more.
Step 7: Slope the Top, Backfill, and Remove Braces
Once the water is added, use a gloved hand or trowel to slope the top of the concrete slightly away from the post on all sides. This simple detail channels moisture away from the wood and significantly helps prevent rot at ground level.
Leave your braces in place until the concrete has fully cured. Fast-setting products typically reach working strength within 4 hours, but we always recommend leaving everything braced overnight before attaching fence panels or any hardware that puts lateral stress on the post. Once the concrete is solid, fill the hole with dirt to grade and you're done.
What Type of Concrete Should You Use for Fence Posts?
Fast-setting concrete is the right choice for the vast majority of residential fence projects. You don't need to rent a mixer or call a cement truck for a standard fence build. A stack of 80 lb bags handles the job efficiently, and the concrete mix ratio is already measured for you.
Standard concrete (the kind you mix yourself in a wheelbarrow) also works, but it takes longer to reach working strength and adds extra steps to the process. Unless you're setting a large number of remaining posts on a commercial project, fast-setting concrete saves time without sacrificing quality.
One product many contractors use is a bagged fast-setting mix that requires no mixing before pouring into the hole. Pour dry, add water, wait. That's the process.
How Deep Should Fence Posts Be Set?
The 1/3 rule is a reliable starting point, but soil composition plays a big role in how far you need to go. Knowing how to set posts in concrete for fence projects in soft or unstable ground means understanding that the standard depth may not be sufficient on its own.
In loose or sandy soil, hole walls may crumble as you dig, and the concrete doesn't grip the surrounding ground as firmly as it does in compact, stable soil. In these conditions, dig a few inches deeper and use a cardboard tube form to hold the hole shape while you pour.
Regardless of fence height, the absolute minimum depth we recommend is 2 feet. That baseline gives the fence structure enough anchor to resist lateral wind load, even in softer soil. For taller fences or fences in exposed, windy locations, go deeper.
Common Mistakes to Avoid When Setting Posts in Concrete
Understanding how to set a fence post in concrete correctly also means knowing the errors that trip up a lot of DIYers. These mistakes are easy to make and often hard to fix after the concrete cures.
Here are the ones we see most often:
- Skipping the gravel base: Water pools at the post base and rot starts within a few years. Always add gravel before you place the post.
- Checking plumb on only one side: A level reading on a single face misses lean in the perpendicular direction. Always check on adjacent sides.
- Holes that are too narrow: A narrow hole limits the volume of concrete around the post, which weakens the anchor. The hole should be at least 3 times the post's width.
- Removing braces too soon: Even with fast-setting concrete, pulling braces within the first few hours risks shifting the post before it has fully firmed up.
- Flat or inward-sloping concrete at the top: A flat or hollow top surface holds water against the post rather than directing it away, which dramatically accelerates rot at the base.
In the Ground vs. On Top of Concrete: Which Is Better?
Setting fence post in concrete by placing it directly in the ground gives you the most secure hold for most residential applications. The post and concrete bond with the surrounding soil from multiple sides, creating a stable column that resists both vertical and lateral movement.
Mounting a post on top of a concrete footing using a metal post base bracket is a valid alternative. It keeps the wood elevated above the soil, which reduces moisture contact. The tradeoff is that the bracket connection point can loosen over time with repeated load from wind and gate movement.
For standard wooden posts on wooden fences, direct in-ground concrete is the simpler and stronger approach when you use treated posts rated for ground contact. For metal post systems using aluminum or galvanized steel, setting directly in concrete is the standard industry method.
Dry Mix vs. Wet Concrete: What Works Best?
There's genuine debate in the fencing world about whether to pour dry concrete mix directly into the hole or to pre-mix wet concrete in a separate container before pouring. For fence post installations in most soil conditions, the dry method is faster, cleaner, and just as effective.
Here's how a fence post in concrete set with dry mix actually works: moisture from the surrounding soil, combined with the water you add from the top, activates the mix in place.
The concrete begins bonding to both the post and the hole walls simultaneously. The result is a solid, reliable anchor without the extra step of mixing.
The dry method works best when the surrounding soil has some natural moisture content, which is rarely a problem in the Pacific Northwest. In very dry, arid conditions, pre-dampen the hole slightly before pouring the dry mix to help ensure full activation.
Soil Type, Frost Heave, and Drainage: What Changes by Location
Not all soil behaves the same way, and setting fence posts in Bellevue comes with specific considerations worth knowing.
Sandy soil: Post holes in sandy soil can collapse during digging. Use a cardboard tube form to hold the shape, and dig slightly wider than the standard minimum to give the concrete adequate contact surface.
Clay soil with poor drainage: Clay expands when wet and contracts when dry, which puts pressure on the post over time. Generous gravel at the base and digging slightly deeper than the 1/3 rule helps offset this movement.
Areas prone to frost heave: The Pacific Northwest sees freezing temperatures that can push posts upward if the holes aren't deep enough. Always dig below the local frost line, and use a gravel base to allow water to drain away from the post base rather than freeze in place around it.
Loose or sandy soil: In particularly soft ground, consider using a slightly wider hole and an extra bag of concrete per post to maximize the anchor surface area.
Why the Right Foundation Protects Your Entire Fence Structure
The whole fence structure depends on the posts. A single leaning or shifting post creates a ripple effect: panels begin to warp, gate hardware binds, fasteners pull away from the wood, and the surrounding posts take on uneven load they weren't designed to carry.
Setting fence post in concrete correctly the first time prevents all of that. A well-anchored post in good concrete should remain solid for 15 to 20 years under normal residential use. That's the kind of return that justifies taking the time to do each step right, from the gravel base to the sloped top.
A Note on the Concrete Fence Post Option
Some homeowners ask about using a concrete fence post, meaning a post manufactured from precast concrete rather than wood or metal.
These are common in agricultural boundary fencing and some commercial applications, where rot resistance and low maintenance are the top priorities.
For most residential wood privacy fences in Bellevue, pressure-treated wooden posts remain the most practical and cost-effective choice. When properly set in concrete with a gravel base and a sloped concrete cap, a treated wood post performs extremely well over the long term.
Precast concrete posts are worth considering if you're building a longer boundary fence and want the lowest possible maintenance profile over decades.
Let Optima Fence and Deck Do It Right the First Time
Setting fence posts is physical, precise work with a narrow margin for error. A post anchored even slightly out of plumb or at the wrong depth will cause real problems within a few seasons, and fixing it means breaking out the concrete and starting over.
At Optima Fence and Deck, we handle every stage of the fence installation process for homeowners across Bellevue and the surrounding communities.
From marking the fence line and pulling any required permits to digging post holes, setting posts in concrete, hanging panels, and installing gates, we do the job correctly from the ground up.
Contact us today for a free estimate. Let's build you a fence that stands straight, holds firm, and looks great for years to come.
FAQs
What is the best way to set a post in concrete?
The best way to set a fence post in concrete is to dig a hole 1/3 the total post height deep and at least 3 times wider than the post. Add 4-6 inches of gravel at the bottom for drainage, place the post centered and plumb, and brace it with 2x4 scrap wood on two sides. Pour fast-setting dry concrete mix directly into the hole, add water per the product instructions (roughly 1 gallon per 50 lb bag), and allow 20-40 minutes to firm up. Slope the concrete top away from the post before it fully cures to direct moisture away from the wood.
What are common mistakes when setting fence posts in concrete?
The most common mistakes include skipping the gravel base (which allows water to pool and rot the post), checking plumb on only one face of the post instead of two adjacent sides, digging holes too narrow to hold enough concrete volume, removing braces before the concrete has fully set, and leaving the concrete top flat or sloping inward toward the post. Each of these errors shortens the life of the fence and often requires pulling and resetting the affected post to fix properly.
How long should you let fence posts set in concrete?
With fast-setting concrete, fence posts typically reach a firm set within 20-40 minutes of adding water. However, full structural strength develops over 24-48 hours. We recommend leaving braces in place overnight and waiting at least 24 hours before attaching fence panels or hanging gates. Applying load too early risks shifting a post that isn't fully cured, which is difficult and time-consuming to correct.
Is it better to set a post in concrete or on top of concrete?
Setting the post directly in concrete provides a stronger, more secure hold for most residential wood fence applications. Mounting on top of a concrete footing using a post base bracket keeps the wood above grade and reduces moisture contact, but the bracket connection can loosen over time under repeated wind and gate load. For standard privacy fences using pressure-treated wooden posts, in-ground concrete is generally the simpler and more durable approach. Post base brackets work well for deck posts and applications where preserving the wood from ground contact is the top priority.
How deep should fence posts be set in concrete?
Fence posts should be set to a depth of at least 1/3 the total post height, with an absolute minimum of 2 feet regardless of how short the fence is. For a 6-foot above-ground fence, that means digging at least 3 feet deep. In regions prone to frost heave, the hole must extend below the local frost line to prevent the freeze-thaw cycle from pushing posts upward and out of alignment over winter.
Can you use fast-setting concrete for fence posts?
Yes, and it is the recommended choice for most residential fence post installations. Fast-setting concrete can be poured dry directly into the hole around the post without pre-mixing in a separate container. After pouring, add water according to the product instructions and the concrete will begin to set within 20-40 minutes. Plan on approximately two 80 lb bags per standard line post and three bags for gate posts that carry additional swinging load.
Do you need to add gravel before setting fence posts in concrete?
Yes. Adding 4-6 inches of gravel to the bottom of each post hole is strongly recommended before placing the post. The gravel layer provides drainage so water does not pool at the base of the post, which is the primary site for rot and decay in wood fence posts. This step is especially critical in areas with clay soil, poor drainage, or high annual rainfall, such as much of the greater Bellevue and King County area.
What type of posts should be used when setting fence posts in concrete?
For wood fences, use pressure-treated lumber rated for ground contact, typically labeled UC4B, as it contains preservatives that resist rot and insect damage even when buried in soil and surrounded by concrete. For metal fence systems, galvanized or powder-coated steel and aluminum posts perform well in concrete. Vinyl posts can also be set in concrete but may require a steel sleeve or internal support depending on the fence height and the load the post needs to carry.


.png)