.png)
.png)
Planning a new fence sounds straightforward until you actually price out the tools. The tools needed for setting fence posts cover four separate stages: digging, mixing, leveling, and finishing. Skip one stage and the whole job suffers.
This guide walks through every tool you need, what each one does, and what it costs to rent versus buy. It also covers the honest question most Bellevue homeowners eventually ask: is renting all this equipment actually cheaper than hiring a professional team?
For inspiration on what a properly installed fence looks like, visit Optima Fence and Deck to explore professional fencing work across the Bellevue area.
What Tools Do I Need to Set Fence Posts in Concrete?
The tools needed for setting fence posts fall into four categories. You need at least one reliable tool in each category before any work begins.
Category 1: Digging Tools
Getting the hole right is the foundation of the entire job.
- Post hole digger (clamshell digger): Two-handled with hinged blades that bite into the soil. Works well in softer ground for a small number of posts.
- Heavy duty digging bar: A solid steel bar used to break through compacted soil, clay, and rocks before the clamshell digger goes in. Non-negotiable in Bellevue's clay-heavy ground.
- Round point shovel: Clears loose dirt from the hole and shapes edges. Also useful for backfill work once the post is set.
- Spade: Better than a shovel for cutting through roots and creating clean hole edges.
Category 2: Powered Digging Options
Manual post hole digging tools work fine for two or three posts. For longer fence lines, powered options are worth the rental cost.
- One-person gas or electric auger: Good for softer ground and runs of up to 10 holes. Tiring over longer distances.
- Two-person auger: More powerful and stable. Best for compacted soil or holes deeper than 24 inches.
- Tractor-mounted auger: Fastest option for large properties. Practical for long fence lines but overkill for most residential backyards.
Category 3: Mixing and Pouring Tools
- Concrete mixing wheelbarrow: Mix directly in the tub and wheel it to each hole. Use a heavy duty model rated for concrete, not a standard garden wheelbarrow.
- Mixing hoe or drill with mixing paddle bit: A mixing hoe moves concrete through the mix more efficiently than a garden hoe. A drill-mounted paddle does the same job faster.
- 5-gallon buckets: For measuring water and carrying dry mix. Keep two or three on site.
Category 4: Leveling and Finishing Tools
- 4-foot level: Check each post for plumb on two sides before concrete sets.
- Two-way post level: Clips onto the post magnetically and reads plumb on both planes at once. Lets you monitor level hands-free while adjusting braces.
- String line and string line level: Keeps all posts aligned at the correct height across the full fence line.
- Tape measure: Post spacing errors mean fence panels will not fit. Measure every time.
- Chalk line: Marks the correct cut height across all posts for a level finish.
💡 Pro Tip: Always call 811 before using any post hole digging tools. It is free and required by law in Washington, but call at least two business days ahead, since utilities need that time to come mark your lines before you dig.
Best Post Hole Digger: Manual vs. Powered
Choosing between manual and powered fence installation equipment depends on your soil, the number of posts, and your budget.
When Renting Makes More Sense Than Buying
- You are doing a one-time project
- Your soil is hard clay or heavily compacted
- You need more than 10 post holes
- You want professional results without buying tools you will store for years

Tool Rental vs. Professional Install: The Real Cost Comparison
This is the section most DIY guides skip. Here is the honest breakdown most Bellevue homeowners need to see before they commit to either path.
What DIY Tool Rental Typically Costs
These are general estimates. Actual costs vary by rental company and project size.
- Two-person auger rental: typically charged by the day
- Concrete mixing wheelbarrow rental: typically charged by the day
- Bagged concrete (standard mix): priced per bag, quantity depends on post count and hole diameter
- Fast setting concrete for fence posts: slightly higher per bag but reduces labor time
- Post bracing lumber and stakes: low cost but adds up across many posts
- Safety equipment (gloves, glasses, boots): one-time purchase if you do not already own them
What You Do Not Pay For When You Hire a Pro
- Tool rental fees
- Fuel for gas-powered augers
- Disposal of excess concrete and soil
- Your own labor time (typically a full weekend or more for a standard fence line)
- Repairs if posts are set incorrectly and need to be re-dug
The Honest Verdict
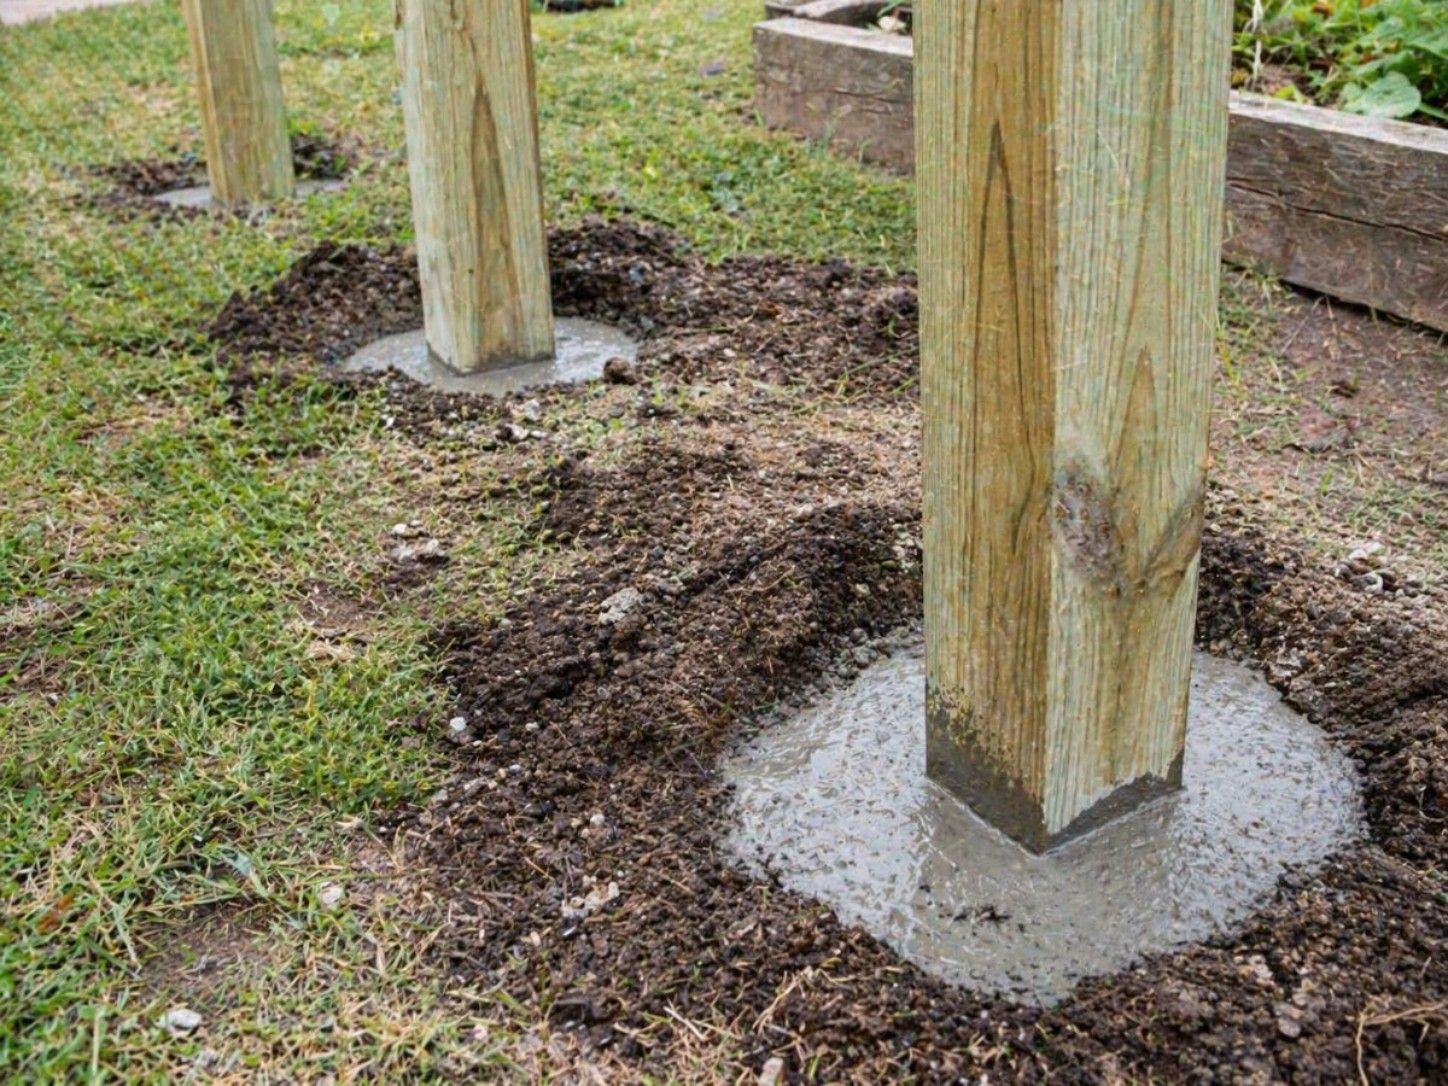
For a fence with fewer than 10 posts in soft soil, DIY with rented tools is genuinely manageable. For anything larger, especially in Bellevue's clay soil where post holes need to go 30 inches or deeper, the tool rental cost combined with labor time often makes professional installation the more practical choice.
Most Bellevue homeowners start pricing out the tools and equipment and end up calling us instead. Not because DIY is impossible, but because the full picture of what it takes is more involved than it first appears.
Post Bracing Tools: Keeping Posts Plumb While Concrete Cures
A post set at the wrong angle is one of the hardest problems to fix after concrete cures. Bracing tools are not optional.
What You Need for Bracing
- Wood stakes and diagonal braces: Cut scrap lumber to length and attach at an angle to two sides of each post, then stake into the ground. Hold the post in position until concrete fully sets.
- Two-way post level: Clip it onto the post and monitor plumb on both planes while you adjust the bracing. Hands-free and accurate.
- Cordless drill or screw gun: Attach braces quickly without hammering near freshly set posts.
Bracing Rules to Follow
- Brace every post on two sides, not just one
- Do not remove bracing until the concrete has fully set, generally 24 to 48 hours
- Re-check plumb immediately before pouring concrete, not just before placing the post
- On windy days, add a third brace on the windward side
Tools for Wood Posts vs. Metal Posts
The tools needed for setting fence posts vary slightly depending on post material.
Wooden Post Tools
- Wood preservative coating: Apply to the bottom of each post before it goes in the ground, especially on cut ends
- Reciprocating saw: Trims posts to height after setting and concrete cure
- Pressure treated wood (chemically treated to resist rot and insects) is standard, but sealing the cut end is still good practice
- Pair with gravel at the base for drainage and reduced rot risk
Metal Post Tools
- Steel drill bit: For drilling through post brackets or hardware
- Anti-corrosion coating: Apply where metal contacts wet concrete to prevent rust at ground level
- Post driver: Some metal post types are driven rather than set in concrete. A post driver (a weighted steel tube) hammers the post directly into the ground without a footing.
- Galvanized hardware throughout reduces long-term corrosion
Browse our completed fence installation projects in Bellevue to see how different post materials and footing methods look on finished residential fences.
Safety Tools You Cannot Skip
Setting fence posts in concrete involves heavy materials, sharp tools, and deep holes. Safety equipment protects both you and the quality of the work.
Personal Protective Equipment
- Work gloves: Concrete is caustic and will crack and dry out bare skin fast. Wear gloves any time you handle wet mix or dry bags.
- Safety glasses: Required when using a digging bar, auger, or drill near soil and rock.
- Steel-toed boots: Post hole digging tools are heavy. One dropped digging bar is all it takes.
Site Safety Practices
- Keep children and pets away from open post holes
- Mark holes with stakes or cones if leaving the site between sessions
- Never leave an uncovered hole overnight
Common Mistakes That Wreck the Job
Even with the right fence installation equipment, using tools incorrectly causes the same problems as not having them.
Avoid These Errors
- Using a regular shovel to dig post holes. A shovel widens the hole too much. Use a clamshell digger or auger for clean, narrow holes.
- Skipping the heavy duty digging bar in hard soil. Forcing a clamshell digger into clay damages the tool and produces ragged, oversized holes.
- Not bracing posts before concrete cures. Even a post that looks plumb will shift. Fixing a tilted post after concrete sets means digging the whole thing out.
- Using a short level on tall posts. A torpedo level on a 9-foot post gives a false reading. Use a 4-foot level minimum.
- Pouring concrete without a final plumb check. Always re-check alignment immediately before pouring. Concrete does not forgive.
- Skipping gravel at the base. Without drainage, water sits at the bottom of the hole and rots wood posts and corrodes metal posts from the bottom up.
Your Complete Tool Checklist Before You Start
Use this list to confirm you have everything before the first hole gets dug.
Digging
- Clamshell post hole digger
- Heavy duty digging bar
- Round point shovel
- Powered auger (rent if needed for 5 or more posts)
Mixing and Pouring
- Concrete mixing wheelbarrow (heavy duty)
- Mixing hoe or drill with mixing paddle bit
- 5-gallon buckets (two to three)
- Fast setting concrete or standard bagged mix
Leveling and Alignment
- 4-foot level
- Two-way magnetic post level
- String line and string line level
- Tape measure
- Chalk line
Bracing and Finishing
- Wood stakes and diagonal braces
- Cordless drill or screw gun
- Reciprocating saw or post cutter
- Chalk line
Safety
- Work gloves
- Safety glasses
- Steel-toed boots
Base and Drainage
- Pea gravel (at least one bag per post)
- Small scoop or bucket for placing gravel in the hole

Here Is What It Takes to DIY and Why Most Bellevue Homeowners Call Us Instead
The tools needed for setting fence posts cover more ground than most people expect going in. Digging, mixing, leveling, bracing, and finishing each require their own equipment, their own technique, and their own time.
For a small project in soft soil, DIY is absolutely doable.
For a full privacy fence in Bellevue's clay-heavy ground with posts going 30 or more inches deep, the tool rental cost, the physical effort, and the risk of getting it wrong often make professional installation the smarter investment.
Our team arrives with every piece of fence installation equipment already on the truck. No rentals. No guesswork. No redoing posts that did not set correctly the first time.
If you want help from a team that handles the whole job, reach out through our fence installation contact page to get a free assessment from Optima Fence and Deck.
FAQs
What tools do I need to set fence posts in concrete?
The core tools needed for setting fence posts include a clamshell post hole digger, a heavy duty digging bar, a concrete mixing wheelbarrow, a 4-foot level, and post bracing materials. You also need safety gear, pea gravel for drainage, and either fast setting concrete or standard bagged mix.
What is the best post hole digger for hard clay soil?
A two-person gas-powered auger is generally the best post hole digger for hard clay or compacted soil. Pair it with a heavy duty digging bar to break through the surface layer before the auger bit engages for best results.
Can I use fast setting concrete for fence posts without mixing it first?
Yes. Fast setting concrete for fence posts can be poured dry into the hole and activated by adding water on top. Most professionals still recommend hand-mixing for larger posts or privacy fences where footing strength and consistency matter most.
Is it cheaper to rent tools or hire a professional for fence post installation?
For small projects with fewer than 10 posts in soft soil, renting tools is generally cost-effective. For longer fence lines in hard clay, the combined cost of tool rental, materials, and labor time often makes professional fence installation equipment and expertise the more practical investment.
What safety equipment do I need for setting fence posts?
Work gloves, safety glasses, and steel-toed boots are the minimum. Concrete is caustic on bare skin and post hole digging tools are heavy, so proper protective gear is essential on every fence installation job regardless of project size.
How do I keep fence posts straight while concrete cures?
Use diagonal wood braces staked into the ground on two sides of each post. A two-way magnetic post level clipped to the post lets you monitor plumb hands-free while you adjust bracing before the concrete sets and locks everything in place.


.png)